How to send text messages using RestSharp
by TextPort
Posted: January 05, 2020

The combination of TextPort's RESTful API and the RestSharp Client for .NET make sending text messages from .NET straight-forward. This article guides you through setting up an account, writing the code, and sending texts using RestSharp in as little as 15 minutes.
Set up an account
The first step is to set up an account. TextPort offers a 15-day free trial. No credit card or money is needed to get started. Visit the free trial page to set up an account and get a free virtual mobile number. The number you choose will be the number that your texts will be sent and received from.
Add an API Application
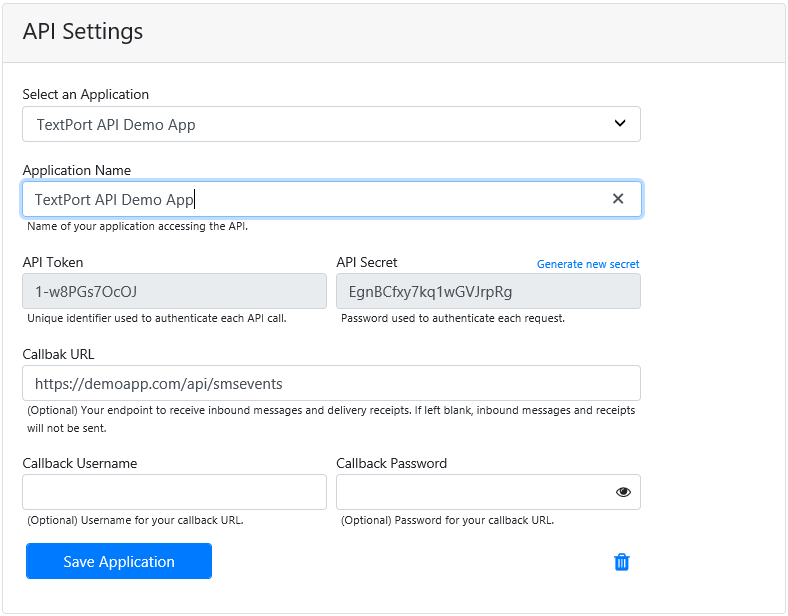
Once your account is set up, go to the API Applications page. Click your username in the top-right corner, then select API Applications.
Assign a name to your your application. TextPort will generate an API token and API key. These are your API username and password. They will be passed in the HTTP header using basic authentication. See the code samples below to see how these are applied.
Associate your API Application with your Virtual Number
The next step is to assign the API application that you just created to your virtual number. Navigate to your Numbers page. Here you will see your virtual number. Click the Apply link to display the Assign API Application dialog.

Select the API application that you created in the step above and click Apply.

Your Numbers page should now look like this.

Now to start writing some code.
Here we'll demonstrate how to send a text message using RestSharp. If you'd prefer to use the native .NET WebClient or the newer HttpClient, this post outlines how to send SMS messages using C#.
Example Using Class Objects for the Request and Response
In this example we'll create two simple classes for our request and response. One advantage of using RestSharp is it handles all the serialization and deserialization for you. If using this approach we'd recommend that you use JSON. XML works fine, but you may need add default constructors and decorate your classes with Xml Element names.
using RestSharp;
using RestSharp.Authenticators;

// The Message class
public class TextPortMessage
{
	public string From { get; set; }
	public string To { get; set; }
	public string MessageText { get; set; }

	// Constructor
	public TextPortMessage(string virtualNumber, string recipientNumber, string messageText)
	{
		From = virtualNumber;
		To = recipientNumber;
		MessageText = messageText;
	}
}

// The Response class
public class TextPortResponse
{
	public string From { get; set; }
	public string To { get; set; }
	public string MessageText { get; set; }
	public string Status { get; set; }
	public string ErrorMessage { get; set; }
	public int MessageId { get; set; }
	public decimal Balance { get; set; }
}

public void SendSMSUsingRestSharp()
{
	// Define some constants. These would likely normally be
	// stored as application settings.
	const string textPortAPIBaseUrl = "https://api.textport.com/v1";
	const string apiToken = "161234-odd4fryG8s";
	const string apiSecret = "X3za2fgdghrghfqgdby";

	// Initialize the RestSharp client
	RestClient client = new RestClient(textPortAPIBaseUrl)
	{
		// Add authentication
		Authenticator = new HttpBasicAuthenticator(apiToken, apiSecret)
	};

	// Create a request object and specify the data format. JSON in this case.
	// See the section below about using XML instead of JSON.
	RestRequest request = new RestRequest("/messages/send", Method.POST)
	{
		RequestFormat = DataFormat.Json
	};
	request.AddHeader("Content-Type", "application/json; charset=utf-8");

	// Create a list of TextPort message objects. Here we're adding just one message,
	// but you can add as many messages as you'd like to a single request.
	List messages = new List();
	messages.Add(new TextPortMessage("14045551212", "12065551650", "Hello World!"));
	request.AddJsonBody(messages);

	List responses = client.Execute>(request).Data;

	// Capture the message Id and perform any other processing.
	int mId = responses.FirstOrDefault().MessageId;
}
An Example Using Raw JSON Instead of Class Objects
You may prefer to simple create raw JSON on the fly and submit it as a string. RestSharp handles that nicely. Here's an example showing that approach:
public void SendSMSUsingRestSharp_RawData()
{
	// Define some constants. These would likely normally be stored as application settings.
	const string textPortAPIBaseUrl = "https://api.textport.com/v1";
	const string apiToken = "161234-odd4fryG8s";
	const string apiSecret = "X3za2fgdghrghfqgdby";

	// Initialize the RestSharp client
	RestClient client = new RestClient(textPortAPIBaseUrl)
	{
		// Add authentication
		Authenticator = new HttpBasicAuthenticator(apiToken, apiSecret)
	};

	// Create a request object and specify the data format. This could quite easily be changed to XML.
	RestRequest request = new RestRequest("/messages/send", Method.POST)
	{
		RequestFormat = DataFormat.Json
	};
	request.AddHeader("Content-Type", "application/json; charset=utf-8");

	// Rwa JSON added as the RequestBody parameter
	string postData = "[ { 'From': '14045551212', 'To': '12065551650', 'MessageText': 'Hello World' } ]";
	request.AddParameter("application/json; charset=utf-8", postData, ParameterType.RequestBody);

	IRestResponse response = client.Execute(request);

	// A string of JSON data is passed back in the Content property.
	string returnJSON = response.Content;
	HttpStatusCode HTTPStatus = response.StatusCode;
}
What if I'd prefer to use XML instead of JSON?
If you prefer to use XML over JSON, simply change the value of the Content-type header key to "application/xml". TextPort will accept and return both XML and JSON payloads. Here is an example:
RestRequest request = new RestRequest("/messages/send", Method.POST)
{
	RequestFormat = DataFormat.Xml
};
request.AddHeader("Content-Type", "application/xml; charset=utf-8");

// Create a list of TextPort message objects.
List messages = new List();
messages.Add(new TextPortMessage("14045551212", "12065551650", "Hello World!"));
request.AddJsonBody(messages);
Conclusion
That's all there is to it. It's that simple to send an SMS message using RestSharp. Click here for more information on TextPort's SMS API documentation and code samples.
Recent Articles
- 7 Benefits of SMS Marketing
- Send Texts Online in 5 Easy Steps
- 5 Ways to Send Text Messages Online
- 5 Rules for Effective SMS Marketing in 2020 - and Beyond
- Sending Text Messages from Foreign Countries to the United States
- Send Picture Messages from Your Computer
- How to send text messages using RestSharp
- How to send text messages using C#
- How to Send and Receive Text Messages Online
- Effective SMS Marketing